Getting Started
This guide takes you from an empty server to a live storefront with one product on it. You start the stack with Docker Compose, claim the one-time setup token from the container logs, walk the setup wizard, then create and publish a product. Plan for about fifteen minutes, plus whatever DNS and TLS take in your environment.
What you need first
Section titled “What you need first”- A host with Docker and the Docker Compose plugin (
docker compose, v2). - The SovEcom repository checked out, or a copy of
docker-compose.ymland thedocker/directory. - An SMTP sender you control (a Brevo API key, or host/port/credentials for any SMTP server). The wizard emails you a verification code before it lets you set the owner password, so email must work before you finish.
- A VAT number if you sell from an EU country. The wizard requires it and checks it against VIES.
1. Configure the stack
Section titled “1. Configure the stack”The production stack lives in docker-compose.yml. It runs Postgres 17 (with pgvector), Redis 7, Meilisearch, the API, the admin SPA, the setup wizard, the Next.js storefront, and a Caddy reverse proxy on ports 80 and 443.
Two secrets are mandatory. Compose refuses to start without them:
| Variable | Used by | Notes |
|---|---|---|
POSTGRES_PASSWORD | Postgres + the API’s DATABASE_URL | Choose a strong value; it never leaves your host. |
MEILI_MASTER_KEY | Meilisearch + the API search client | Any long random string. |
Set them in a .env file next to docker-compose.yml:
POSTGRES_PASSWORD=replace-with-a-long-random-secretMEILI_MASTER_KEY=replace-with-another-long-random-secretSet one optional variable to fix the setup banner link. The API reads SETUP_URL and prints it in the first-boot log banner. Leave it unset and the banner prints the placeholder http://YOUR_HOST/setup. Set it to the address your operators open:
SETUP_URL=http://setup.localhostRouting and hostnames
Section titled “Routing and hostnames”Caddy routes each app to its own host (see docker/Caddyfile):
| App | Host (default Caddyfile) |
|---|---|
| Storefront (public site) | http://localhost |
| Admin | http://admin.localhost |
| Setup wizard | http://setup.localhost |
API (and /health) | http://api.localhost |
*.localhost resolves to 127.0.0.1 in browsers, so this works on the machine running Compose with no DNS changes. For a real deployment, map these subdomains to your domain and turn on Caddy’s automatic HTTPS. See Deployment for the production proxy setup.
2. Start the stack
Section titled “2. Start the stack”From the directory holding docker-compose.yml:
docker compose up -d --buildCompose builds the API, admin, setup, and storefront images and starts every service. The first build pulls base images and compiles the apps, so give it a few minutes. Postgres, Redis, and the API come up in dependency order through their health checks.
Confirm the API is healthy:
curl http://api.localhost/health3. Get the one-time setup token
Section titled “3. Get the one-time setup token”SovEcom does not ship a default admin password. On first boot, while the system is not yet installed, the API mints a single setup token, prints it once to stdout, and expires it after 24 hours. This is the same pattern GitLab and Discourse use, and it closes the default-credentials attack that hits fresh self-hosted installs.
Read the token from the API container logs:
docker compose logs apiLook for the banner. It prints once, near the top of the API’s boot output:
═══════════════════════════════════════════════════════════════  SovEcom is not yet configured.  Open the setup wizard at: http://setup.localhost  Enter this one-time setup token:
     <your-one-time-token>
This token will expire in 24 hours and can be used once. Regenerate it by restarting the container if needed.═══════════════════════════════════════════════════════════════4. Run the setup wizard
Section titled “4. Run the setup wizard”Open the wizard at http://setup.localhost (or whatever you set as SETUP_URL). It runs eleven steps. The wizard refuses to run again once the store is installed, so this is a one-time pass.
The wizard’s first step asks for the setup token printed in your container logs — this locks setup to whoever can read the logs, so nobody can hijack a fresh install.
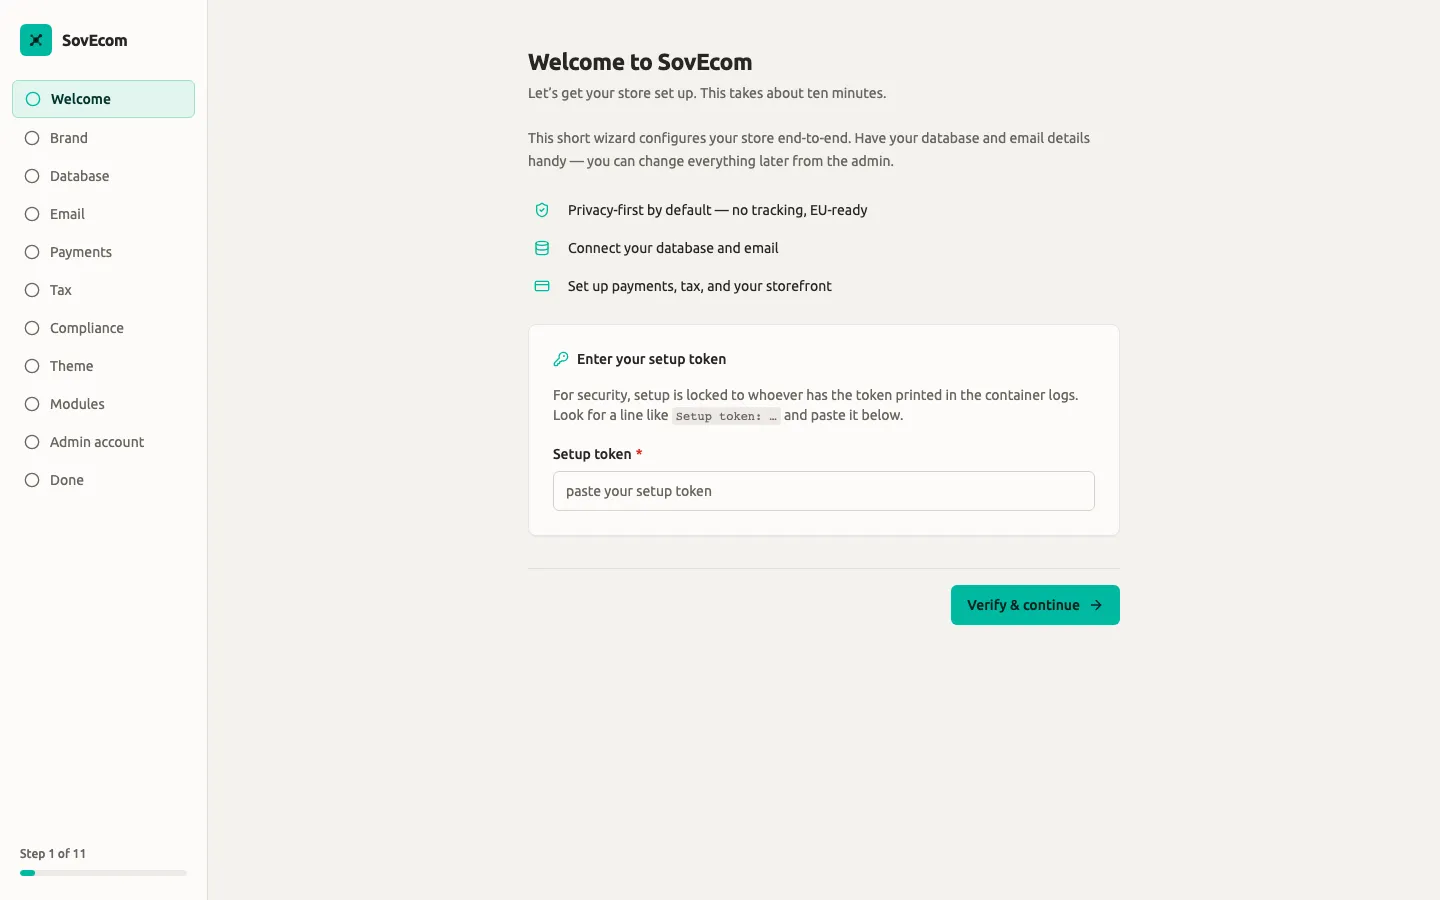
Welcome
Section titled “Welcome”Paste the setup token and select Verify & continue. The wizard validates the token against the API before it advances. An invalid or expired token shows an inline error and does not move forward. Get a fresh one from the logs if needed.
Upload an optional logo (PNG, JPEG, WebP, or SVG, up to 5 MB) and pick your primary and secondary colours. Turn on the gradient accent toggle to blend the two. Everything here is optional; the defaults are a teal primary (#00B9A0) and a dark secondary. You can change all of it later in the admin.
Database
Section titled “Database”Choose Bundled Postgres (recommended, nothing to configure) to use the Postgres that ships in the stack, or External database to point at a managed Postgres (Neon, Supabase, RDS). For external, paste a postgres:// or postgresql:// URL and use Test connection to probe it before continuing.
Pick Brevo (one API key, mapped to Brevo’s SMTP relay) or a custom SMTP server (host, port, TLS, optional credentials). Set the “from” address your store sends from. Use Send test email to confirm delivery.
Payments
Section titled “Payments”Select the methods you want to accept: Stripe (cards), SEPA Direct Debit, Apple Pay / Google Pay (via Stripe), or Manual / offline. Checking Stripe (cards) reveals fields for the secret key, publishable key, and webhook secret; these are stored encrypted at rest. This step is optional. You can continue with nothing selected and wire payments up later from the admin. See Payments for the full setup.
Pick your business country. The wizard sets a tax default from it:
- Pick an EU country and the wizard turns on EU VAT and tax-inclusive pricing, then shows the VAT-number and OSS controls.
- Pick a non-EU country and it defaults to no automatic tax.
For an EU business you must enter your EU VAT number with the country prefix, for example FR12345678901. Select Validate & continue and the wizard checks it against VIES inside the same request. The check fails open. A “valid” verdict shows a green check. An “invalid” verdict warns you but still lets you continue and correct it later. A VIES outage is informational and never blocks setup.
Set the OSS posture to match the One-Stop-Shop rule for your cross-border EU B2C sales:
| Choice | Effect |
|---|---|
| Below the €10,000 threshold | Charge your home-country VAT. |
| Above the threshold, or opted in | Charge destination VAT via OSS. |
Full ongoing tax operations live in Tax & VAT and EU Invoicing & VAT Ops.
Privacy & compliance
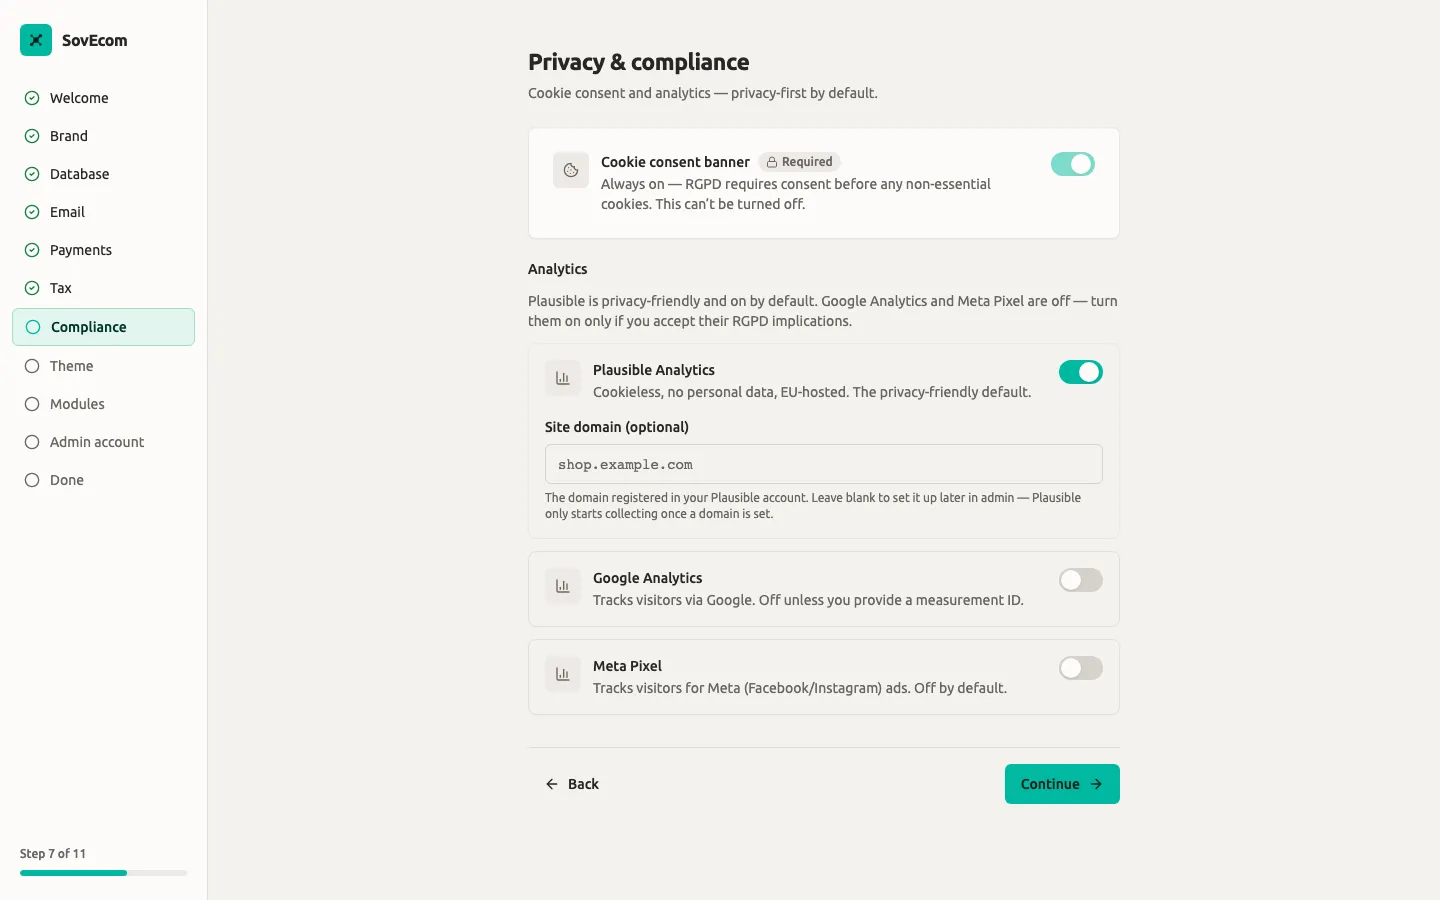
Section titled “Privacy & compliance”This step is privacy-first by default (RGPD):
- The cookie consent banner is locked on. Consent is required before any non-essential cookie, and the server hard-pins this regardless of the UI. You cannot turn it off.
- Plausible analytics (cookieless, no personal data, EU-hosted) is on by default. Add your registered site domain to start collection, or leave it blank and set it later. Plausible only collects once a domain is set.
- Google Analytics and Meta Pixel are off. Enabling either reveals an RGPD warning and a required id field. Both ship visitor data to non-EU processors, so you are responsible for a lawful basis, a data-processing agreement, and disclosing the tracker in your privacy policy.
See RGPD & Data Retention for your obligations as controller.
The Privacy & compliance step is privacy-first by default: the cookie consent banner is always on (RGPD), Plausible (cookieless, EU-hosted) is enabled, and Google Analytics + Meta Pixel are off — each carries an RGPD warning and only turns on if you accept its implications.
Storefront theme
Section titled “Storefront theme”Pick a starting theme from the seeded set (the default and boutique themes). The first is pre-selected. Continuing activates the theme you chose. Theme previews are placeholders for now; switch themes anytime from the admin once the gallery lands. See Themes for theme development.
Modules (optional)
Section titled “Modules (optional)”This step lists the platform’s built-in modules so you can install and enable them during onboarding. The starter set is reviews, recently-viewed, wishlist, and notify back in stock. Each card shows what the module adds (the storefront slots it renders into) and the permissions it requests.
Select the ones you want and choose Continue to install and enable them. Each module runs sandboxed in a forked worker. Install runs no module code; enabling forks the worker and runs the module’s migrations. The step is optional, so Skip installs nothing. Anything already installed shows an “Installed” badge and stays untouched. If a module fails to install, the wizard names it and keeps you on the step. Deselect that module and continue, or add it later.
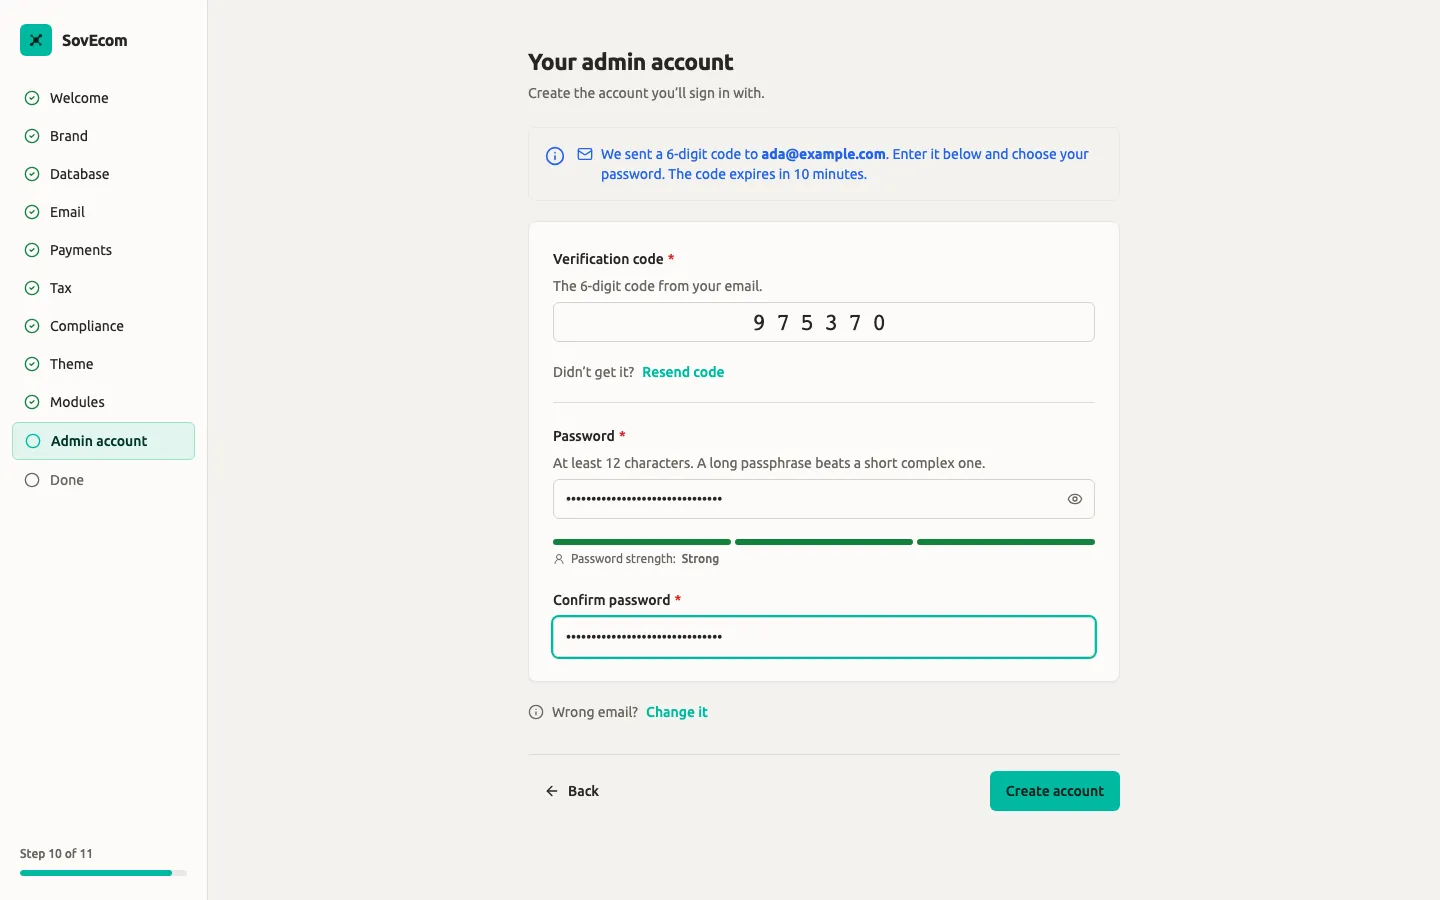
Admin account
Section titled “Admin account”This creates the account you sign in with, in two phases:
- Request. Enter your name and email, then select Send verification code. The API emails a 6-digit code to that address. The email becomes your sign-in identity.
- Verify. Enter the code (it expires in 10 minutes; use Resend code if needed) and set your password. The password must be at least 12 characters, and the server rejects any password on its bundled weak-password denylist (an offline check, no third-party lookup). Use a long passphrase.
The Admin account step emails a 6-digit verification code, then has you set a password (minimum 12 characters — a long passphrase beats a short complex one). This is the account you’ll sign in to the admin with.
Review the summary (brand colour, database mode, tax regime, currency, admin email), then select Finish setup. This consumes the setup token, flips the system to installed, and redirects you to the admin. If a precondition is still missing (no admin account, no tax settings, or an expired token), the wizard names it and offers a jump back to the step that fixes it.
After this point, reopening the wizard URL shows an “Already set up” screen with a single link to the admin. The wizard never runs twice.
5. Sign in to the admin
Section titled “5. Sign in to the admin”Open http://admin.localhost and sign in with the email and password you just created. The admin is where you manage catalog, orders, customers, discounts, shipping, and store settings.
6. Create your first product
Section titled “6. Create your first product”In the admin, go to Products in the sidebar, then New product (route /products/new).
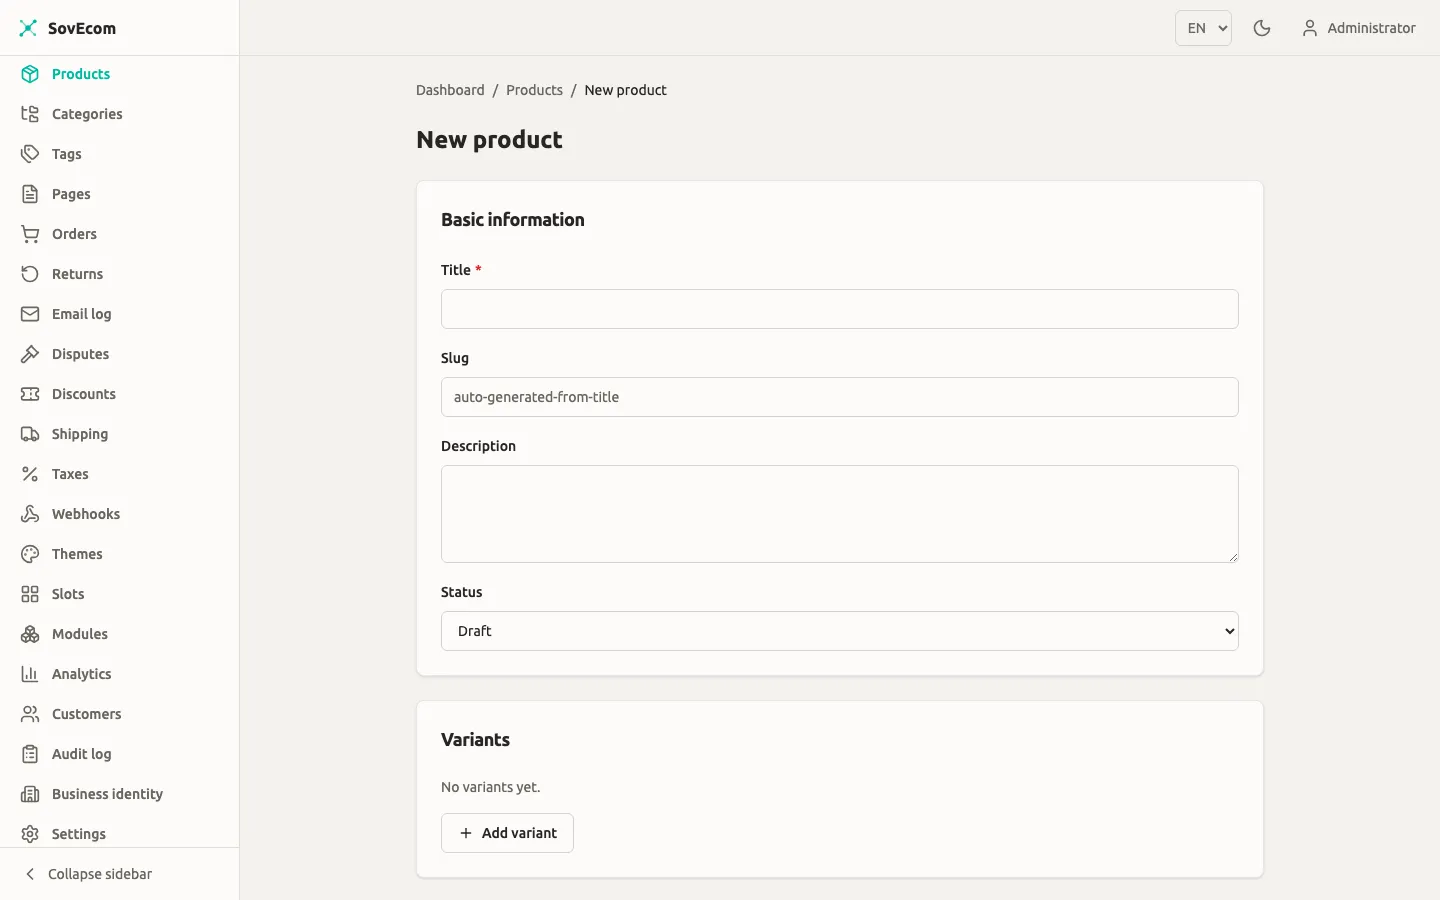
Fill in Basic information:
| Field | Notes |
|---|---|
| Title | Required. |
| Slug | Optional. Leave blank and it is generated from the title. This becomes the storefront URL. |
| Description | Optional free text. |
| Status | Draft, Published, or Archived. Only Published products appear on the storefront. |
Add at least one variant. Each variant has:
| Field | Notes |
|---|---|
| SKU | Your stock-keeping code. |
| Price (cents) | Integer cents. Enter 1999 for €19.99. |
| Currency | ISO code, e.g. EUR. |
| Stock quantity | Integer. |
| Position | Sort order among variants. |
Optionally attach product images, then assign categories and tags. Save the product. To make it public, set Status to Published and save again.
For the full catalog workflow (categories, tags, bulk operations, search indexing), see Catalog.
7. View your storefront
Section titled “7. View your storefront”Open the public storefront at http://localhost. Browse the product listing at /{locale}/products (for example http://localhost/en/products), and open your product at /{locale}/product/{slug} (for example http://localhost/en/product/my-first-product). A published product with a priced variant appears with its title, description, image, and VAT-aware price.
If the product does not show up:
- Confirm its Status is Published.
- Confirm at least one variant has a non-zero Price (cents) and a currency, or is marked free.
- Confirm you are on the right locale segment in the URL.
Where to go next
Section titled “Where to go next”- Catalog: products, categories, tags, search.
- Tax & VAT and EU Invoicing & VAT Ops: ongoing tax and compliant invoicing.
- Payments: Stripe, SEPA, and method configuration.
- Email & Deliverability: sender reputation and transactional mail.
- RGPD & Data Retention: consent, retention, controller obligations.
- Backup & Recovery and Upgrades: keeping the store healthy.